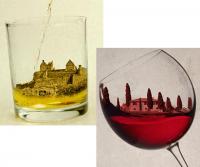
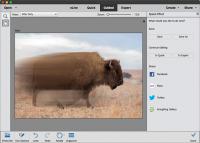
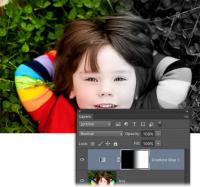
Home
photolesa.com
The creative tutorial home of image wrangler, Lesa Snider.

Photoshop Elements

Using Levels in Photoshop and Photoshop Elements

To correct the lightness or brightness in your images, you can reach for a Levels adjustment. In this video you'll learn how to use Levels non-destructively, plus you'll learn how to use the Levels histogram and sliders to visually adjust the dark and light areas of your image to create greater contrast. Happily, this technique works exactly the same way in Photoshop Elements.

Build a Custom Twitter Background in Photoshop

Custom Twitter Background in Photoshop

Declared one of the top web moments of the decade by The Webby Awards, the 140-character realm of Twitter is a phenomenon. It also happens to be a great place for shameless self-promotion, graphically speaking. In this tutorial you’ll learn how to create and upload a custom Twitter background.

Adding a quick color tint

Adding a color tint to a photo is a fabulous way to change its mood, or evoke a vintage or romantic feel. It's also a great way to salvage a photo whose color and lighting is rather subpar. In this video, you'll learn how to easily give your photos a unique feel by applying a color tint using a non-destructive adjustment layer in Photoshop. The same technique works in Photoshop Elements, too. Click here to visit the Quick Color Tint video on Planet Photoshop. I hope you enjoy it!

Create Stunning Black and White Images with Photoshop and Photoshop Elements

I'm proud to announce that this month I'm doing weekly videos for PlanetPhotoshop.com. Previously I contributed videos to PhotoshopUser.com to help out my overly-busy buddies Matt K. and Corey B. If you used to catch my videos over there, you can get the same practical technique video goodness over at Planet. This is actually a huge score for me as the Planet site isn't password protected, so I get to be in front of a slew of eyeballs (I'll also be uploading videos to my regular YouTube channel periodically, so don't miss those either!).

Blur Baby Blur!

Few techniques can draw a viewer’s eye to a focal point—or save a busy photo—like selective blurring. However, what we're really talking about here is creating a shallow depth of field, which is the result of shooting in macro or portrait mode, or from using one of your camera's manual modes to specify a small f-stop (f1.8, f2, f2.8 and so on). This opens your camera’s lens (or aperture) wide, thereby reducing the size of the area which can be in focus.

Learning to Love Levels

Ed. Note: This article first appeared in the most amazing magazine ever, called Elements Techniques. It's packed full of tutorials just for Elements users, along with all kinds of photography tips. You can subscribe to it by clicking this link.

Goin' Borderless!

Imagine gazing upon the perfect picture on your screen. You've cropped the distracting bits out of the background, color corrected it to perfection, smoothed a wrinkle here and zapped a bag there, and last but not least you've applied just the right amount of sharpening. It's breathtaking and quite possibly the best shot you've ever snapped in your life. Your skin begins to tingle, goosebumps travel up your spine and you know beyond a shadow of a doubt that the photo must live in print!

Fun with Elements Effects

Photoshop Elements is such a wonderfully friendly program to use, though with all the little flippy triangles, buttons, and so on, it can be a challenge to find some of the built-in effects. Today we'll do a little digging and take a peek at how you can easily turn a full-color photo into an aged sepia tint, complete with a burned-in (darkened) edge vignette. Read on!

Creating Coloring Book Art

It's easy to get caught up making creative projects for grown-ups like calendars, photo books, and scrapbook pages... but what have you made for the little ones lately? The next time the creative bug bites, consider converting your photos into art for the coloring book crowd instead.

Pages