
PhotoLesa's photography gear provided by:


 So I bought my husband a Nikon D50 for Christmas. He's totally obsessed with the camera (and a great camera it is), and he is snapping pictures constantly. He's outfitted it with another lens, a speed flash, and a couple of two gig memory cards. He's all set until he transfers the images onto his Mac. For then, my friend, he's a fish sans water. He doesn't know squat about resizing an image for print, the web, or an email. He's heard of the word resolution but couldn't define it if his life depended on it.
Therefore, henceforth, today we shall continue on with a tutorial series we started a few months ago and touch on resizing images from your digital camera. We'll start by covering basic graphic terminology, such as resolution, pixels, and different image file formats. We’ll learn about the relationship between resolution and pixels, which will allow you to correctly resize any graphic for any use, and which graphic format to use when.
Image resolution is the number of pixels displayed per unit of printed length in an image. It’s a measurement used for printing (hence the phrase “of printed length”) and it’s usually stated in pixels per inch (ppi—used when referencing stuff onscreen) or dots per inch (dpi—used when referencing something that’s about to be printed because printers print dots).
The smallest picture element of any digital image is called a pixel. Images are displayed in tiny blocks (also referred to as dots) of color that together form an entire image. That’s a pixel.
The way resolution affects an image is thus: For a given number of pixels in the width or height of an image, the higher the resolution, the closer the printer packs those pixels together in order to make a beautifully smooth and sharp print. The closer the pixels are packed together, the smaller the image will be physically when printed. Conversely, the lower the resolution, the more loosely those pixels are packed and the larger the image can be physically—though it loses definition and the print will look extremely crapified.
Because our monitors can only display a certain amount of information our eyeballs/brains can process, resolution really only matters to printing devices. That’s right, it doesn’t mean a hill of beans until that image is headed for a printer, because only a printer can do anything with the resolution measurement. Your monitor just doesn’t care: A 72 ppi image will look exactly the same as a 3000 ppi image, though the latter will appear physically huge on your screen and you’ll need to zoom way out to see it all.
So how much resolution do you need to make a gorgeous print? It depends on the printer. While the current crop of consumer-level inkjet printers do a fine job at 225-250 dpi, a professional service bureau may require 300+. If it’s your own printer, run a few tests. If someone else is printing it, ask them what resolution they need.
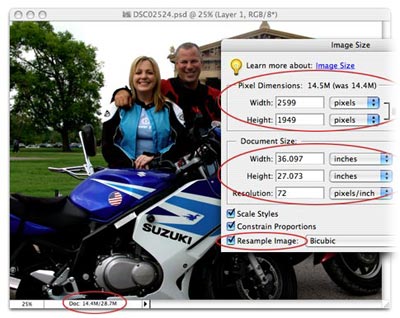
Let’s take a photo from a high-quality digital camera. I popped open the photo in Elements and took a peek at its Image Size dialog to find that it’s 2599 x 1949 pixels, but only 72 ppi. Does this mean my photo is of low-quality and unsuitable for print? Not at all.
Important things to note in the screenshot above:
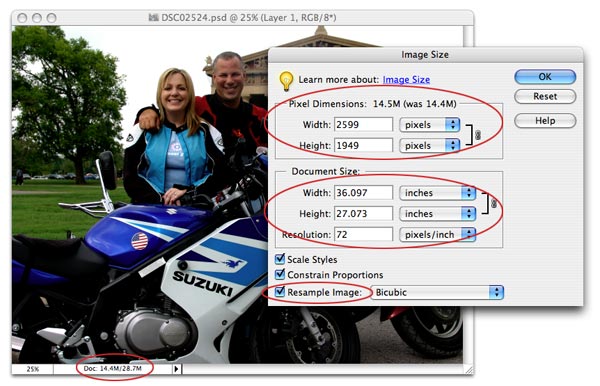
Now, watch carefully as I increase the resolution of the image without messing with the number of pixels. Here’s how in either Photoshop CS or Elements.
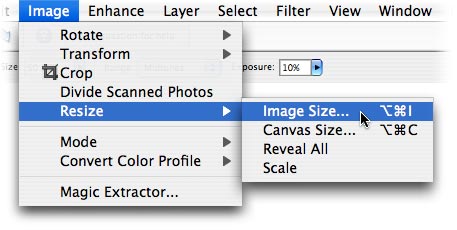
Step 1: In Photoshop Elements, choose Image > Resize > Image Size. In Photoshop CS2, choose Image > Image Size. TIP: Keyboard shortcut for either software: Command + Option + I.
Step 2: At the bottom of the dialog, uncheck Resample Image. This all-powerful, magic option locks the number of pixels contained in the image, thereby locking the quality. Enter 300 into the resolution box and look what happens:
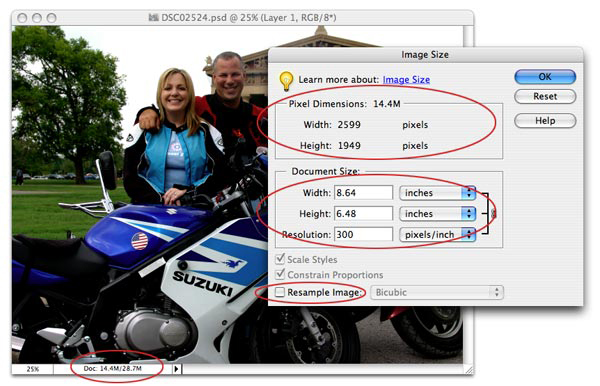
The image now has a resolution of 300 ppi and the physical size has decreased to about 8.5 x 6 inches. See how the physical dimensions of the image changed but the pixel information didn’t? I have exactly the same number of pixels I started out with: 2599 x 1949; they’re just packed more tightly together. The file size didn’t change at all—it’s still 14.4 MB, as evidenced in the document window and in the Image Size dialog (another clue that the pixel data didn’t change). I haven’t changed the quality (pixels), I’ve just changed the measurement (ppi) which only affects the printed image.
Admittedly, this is confusing because the onscreen image didn’t change a bit (see earlier paragraph on monitors, eyeballs, and brains). The truth is only revealed by the Image Size dialog. The thing to remember is that as long as you uncheck the Resample Image box, you can tweak the resolution ‘til the cows come home and you won’t alter the image quality at all. Ever. If you leave the Resample Image box checked, though, you’re messing with photo quality.
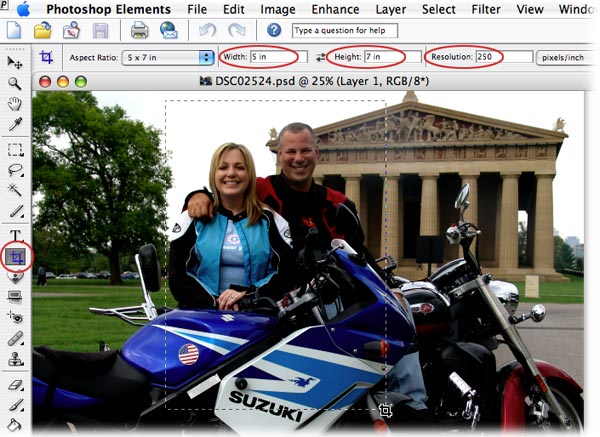
In both Photoshop and Elements, you can resize the image at the same time you set the resolution by using the Crop tool.
Step 1: Press C to select the Crop tool in either software package.
Step 2: In the options toolbar at the top of your screen, enter the dimensions of the desired image and the resulting resolution. TIP: Be sure to include the unit of measurement in the width and height boxes, as shown below. Draw a box around the important bits of your image and when you get it just right, press Return to accept the crop. TIP: Press the Escape key to exit a crop.
Step 3: Choose File > Print to print it now, or save the photo to print later. If it’s being sent to someone else to print, choose File > Save As and pick TIF from the file format pop-up menu. TIFs can be opened in most image editors and is a lossless graphic format, which will touch on a bit later. You can also print directly from a native Photohop or Element document.
That's all for this week folks! Until next week, have fun printing a few photos of your own and experience the joy of placing them into an actual frame. It's fun!


PhotoLesa's photography gear provided by: