
PhotoLesa's photography gear provided by:


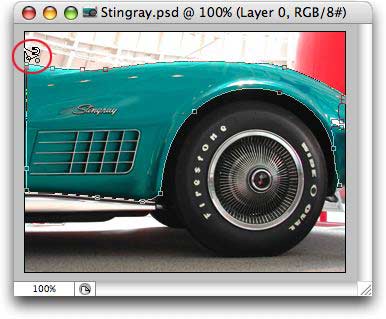
I took a picture of a gorgeous Stingray not long ago at the Corvette Museum in Kentucky. The shot turned out beautifully, though, what if I wanted to change the car color to something else? It'd be easy enough if the turquoise was solid, but the car is shiny and contains reflections. You'd think making this car a bright purple would be a time-consuming and frustratingly tedious job. Not so my friends. I'm going to show you a quick and easy way to make this car any color I want, all the while preserving the reflections, plus the gray Stingray logo and air intake vents.
Rev those engines and let's get started!
The first thing you want to do is select the area of the color you wish to change. There are a bunch of ways to do this, depending upon what it is you're selecting. Sometimes it's easier to select the area you *don't* want to mess with, and then hop up to the Select menu and choose Inverse (Mac: Shift + Command + I, PC: Shift + Control + I). For this example, I used ye 'ole Magnetic Lasso Tool.
Step 1: With the image open and editable (double-click the Background layer to remove the padlock), select the Magnetic Lasso tool from the toolbar, or just press the letter L.
Step 2: Click once on your starting point, then just drag around the area you wish to select. You'll want to click when changing directions. I clicked once when I started to head back up around the wheel well on the right. To close the selection up, just click once where you began (you'll see a tiny circle appear next to your cursor when you hover over that point), as circled in red below:
Step 3: After closing the selection, you'll see little "marching ants" appear. Overall, the Magnetic Lasso did a decent job, though I have a bit to clean up on the right side. I'm going to pop into Quick Mask Mode by pressing Q, then use an Airbrush (just press B) to paint in the appropriate areas. Paint with white to reveal and black to conceal. I'm going to paint in the nose of my Vette with white, as shown below. Once finished, just press the Q key again to exit QuickMask mode.
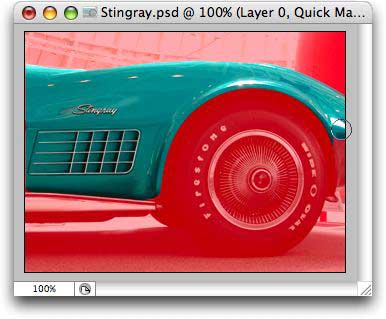
TIP: Use the left bracket, [, to decrease brush size, and the right bracket, ], to increase brush size. Press X to swap color chips in order to switch from painting with black to white, and vice versa.
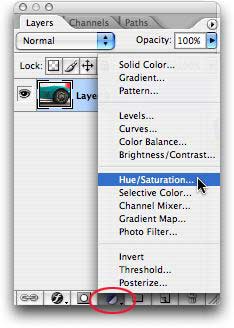
Step 4: Now that the appropriate car bits are selected, create an Adjustment Layer by clicking the little half black/half white circle at the bottom of your Layers Palette (circled in red below). Choose Hue/Saturation.
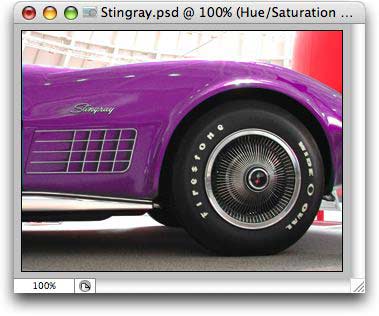
Step 5: In the resulting dialog, just grab the Hue slider and give it a tug in either direction. Smile as you watch your selection morph into different colors of the rainbow! You'll want to position the dialog box where you can see your image at the same time, of course. In this example, by dragging way to the right, my Vette became bright purple.
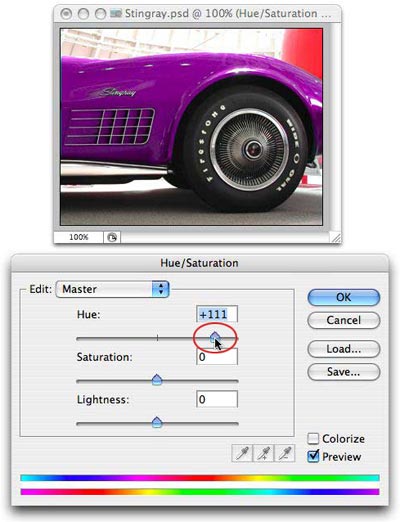
Tweak the Saturation and Lightness sliders to get just the right color for your liking.
That's all there is to it! And by using an Adjustment Layer, we've harmed nary a pixel on our original image's head. This is a *very* handy little trick to have up one's sleeve when one wishes to change the color of an article of clothing, a flower, or literally anything at all. The possibilities are truly endless.
Until next time, happy color shifting!


PhotoLesa's photography gear provided by: