
PhotoLesa's photography gear provided by:


It only takes a few seconds to crop your images, so as to better focus on the subject matter and eliminate unwanted bits (besides, it's fun to chop things up!). Focus on the subject matter, and get in as close as you can. This not only makes the image look better, but it reduces the file size as well, and everybody appreciates that ;)
Cropping to a specific size
If you know the target resolution and size of the image you want to create, you can dial that information directly into Photoshop. Let’s say that you have an image you want to print at 4x6 on an inkjet printer which can read 360 dpi.
Step 1: Open the image, and press C for the Crop tool.
Step 2: In the toolbar at the top of your screen, you’ll see text input boxes for width, height, and resolution. In the width box, type: 4 in. Then in the height box, type: 6 in. (yes, you MUST include the unit of measurement!). In the resolution box, type: 360 (it's not necessary to type in pixels here). NOTE: To zero out these numbers at any time, simply press the Clear button on the right of this same toolbar.

Step 3: Draw a selection box around the subject matter in the image. See how Photoshop constrains the selection box to the numbers you dialed in?
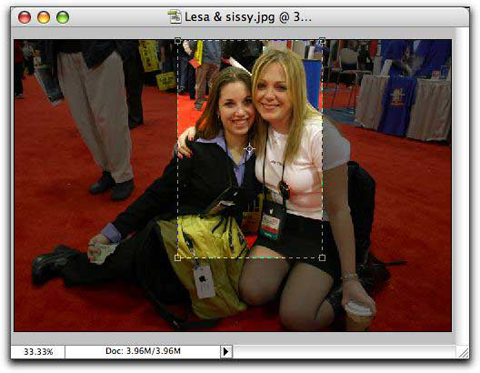
Step 4: Adjust the crop box by tugging on any of the four corner handles as necessary. Press Return to accept the crop. NOTE: If you want to abandon the Crop, then press the Escape key.
Now that you know how easy it is to resize your images, there's no excuse for sending huge photos as email attachments, or for sticking honkin' big images in your forum posts. Cheers!


PhotoLesa's photography gear provided by: