
PhotoLesa's photography gear provided by:


Few tools are as feminine as the Feather option, and I mean that in the most wonderful of ways. For nestled snugly within the Selection menu, it has the power to make all things soft. Well, that is, all selections. No matter which selection tool you choose, the Feather option instantly softens its sides by the number of pixels you specify. The higher the number, the more gradual the fade, or degree of resulting "softness". The fewer, the more abrupt the edge will be.
Not only does the Feather option have the power to blend one photo into another for myriad effects, it has the power to evoke emotion. For example, picture a soft vignette highlighting a bride's bouquet framed on a bed of blood-red rose petals. Imagine the clasped hands of newly-ringed fingers resting softly on a satin pillow, blended into a solid, light-peach background. The possibilities are endless.
Today I'm going to share with you a technique for using the Feather option that's not just for photographers, but one highly useful for graphic designers as well. Though we'll use the Feather option in the same way, we'll produce completely different yet practical effects highly handy to have in one's personal bag of tricks.
An oldie but goody, this effect never goes out of style. We'll use it today to encircle lovers in an ellipse. Nothing says romance like a vignette!
Step 1: Pop open a Soon To Be Romanticized image in Photoshop Elements. Let's protect ourselves from ourselves and make a copy of the Background layer by pressing Command -J (PC: Ctrl-J). In the Layers Palette, go ahead and turn the visibility eyeball off on the original layer.
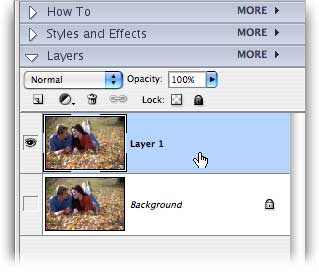
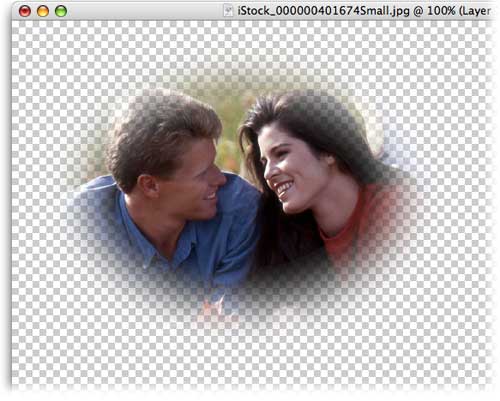
Step 2: Grab the Elliptical Marquee Tool and draw a selection around the couple's heads in the photo. TIP: Hold the Option key (PC: Alt) to draw the ellipse from the center outward. Hold the Shift key while you drag to constrain the ellipse to a perfect circle. Press the Spacebar to as you draw the selection to move it around on the photo (just release the Spacebar and continue making the selection larger or smaller). These keyboard shortcuts also work when using the Rectangular Marquee tool.
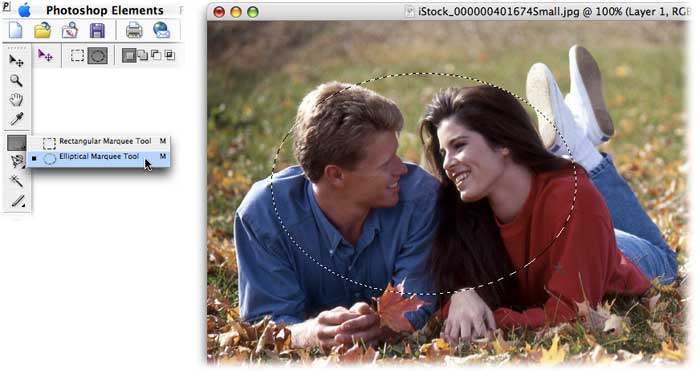
Step 3: Control-click (PC: Right-click) within the selection area and choose Feather from the contextual menu (you can also choose Feather from the Selection menu at the top of your screen). Enter 20 pixels and click OK. This should give us a nice soft edge; though, if you're working on a high resolution image, this number will need to go higher. Feel free to experiment! All you have to do is press Command-Z (PC: Ctrl-Z) to undo your last action, or worst case scenario, trash the layer you're working on and begin again with the original Background layer (see the value of creating the copy in Step 1 above?).

Step 4: Choose Select > Inverse, so everything except the couple is selected.
Step 5: Press Delete and the background will disappear, leaving only the couple surrounded by a soft edge.
At this point, we can do a couple of things: We could add a solid background beneath the photo, or we could add another photo altogether. Let's do both.
Adding a solid background
Step 6: Command-click (PC: Ctrl-click) the New Layer icon in the Layers Palette. This will create a new layer below the one currently selected, which is the photo.
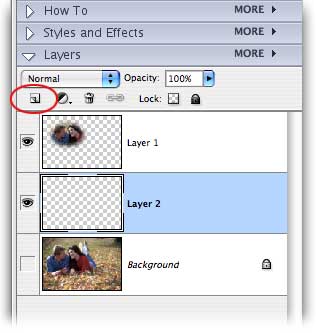
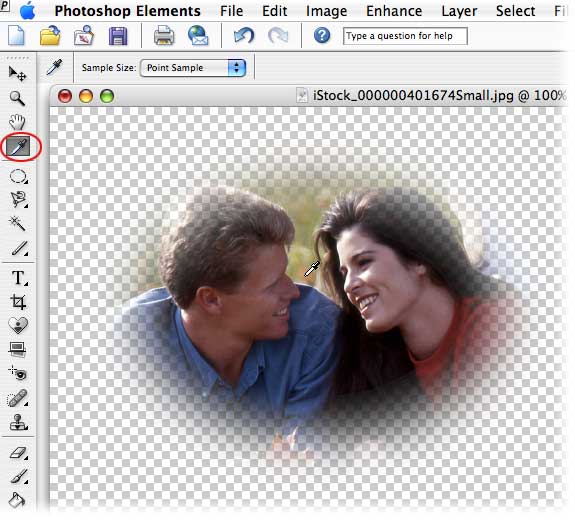
Step 7: Pick up a new background color from the photo itself by pressing I to select the Eyedropper tool. Mouse over to the photo, choose a color and click once to load it as the foreground color chip.
Step 8: With the new layer still selected over in the Layers Palette, press Option-Delete (PC: Alt-Delete) to fill it with color.

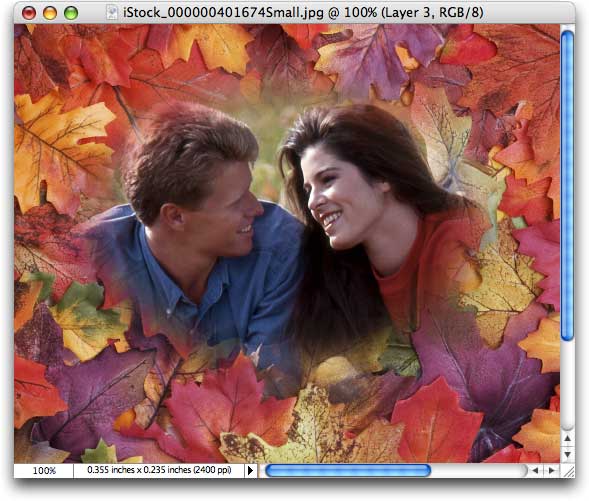
The leaves in the original photo were nice, but they weren't very colorful. Let's see what happens if we place our vignette onto a background of super brilliant fall leaves from iStockphoto.
Step 9: Open the photo to be used as a Background--in our case the brightly colored leaves--and position the windows on your screen so you can see both images. From the Layers palette, click and drag the new leaf photo layer and drop it onto the vignette window.

TADA! Talk about an infusion of energy! What a difference a new background can make.
See you back here next week for more on feathering!


PhotoLesa's photography gear provided by: