
PhotoLesa's photography gear provided by:


Color is such an important part of your image, and happily Photoshop gives us many ways to intensify it so your picture pops right off the page.
In today's tutorial (yet another teaser from the forthcoming Photoshop: The Missing Manual--well, parts of it anyhow), you'll learn three distinct ways for creating more vibrant color in your image. And as a bonus, the first two methods also work in Photoshop Elements. Read on!
One of the easiest methods is to create a Hue/Saturation adjustment layer by clicking the half black/half white circle at the bottom of your Layers palette (it lives at the top in Photoshop Elements). Drag the saturation slider slightly to the right and watch the color brighten. The only problem with this method is that it boosts the saturation in all the colors of your image, including skin tones. Unless you like the look of hot pink skin, this particular adjustment may not be the best choice.
Over in Camera Raw, which comes with both Photoshop CS3 and Elements you've got a little more leeway. At the very bottom of the dialog box you'll find three sliders designed to do nothing but intensify color. They include saturation, as well as:
Obviously if you're not editing in Camera Raw, those sliders won't do you any good at all.
If you're using Photoshop, one of the best ways of all to make your color pop is by temporarily popping into another color mode and doing some creative channel blending. It's a technique I learned from The Great Kelby and I like to call it "Lab Pop." Don't let the whole "color mode" thing scare you; this technique is easier than you could possibly imagine. Read on!
Contrary to what you might think, the Lab Color mode is pronounced as an acronym: L, a, b, and not as the word "lab." It's unique in that it separates the light information (also called luminance) of your image into its own channel called Lightness, and the colors are divided into two other channels: "a" and "b". The "a" channel holds the red and green information, and the "b" channel holds yellow and blue.
Step 1: Open an image and duplicate the original layer by pressing Command + J (PC: Ctrl + J).
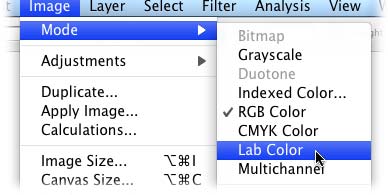
Step 2: Pop into Lab Color mode by choosing Image > Mode > Lab Color. If Photoshop asks if you want to merge layers, sweetly say “no, thank you” by clicking the Don’t Merge button.
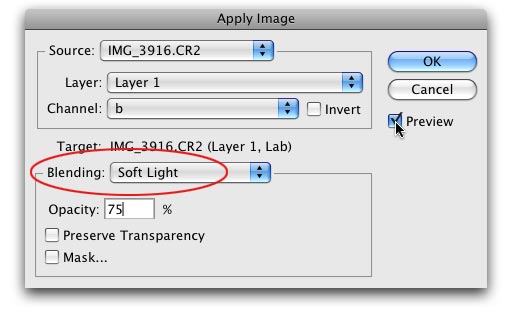
Step 3: Choose Image > Apply Image. If you’re dealing with a multi-layered document, go ahead and choose the right layer from the (you guessed it) Layer pop-up menu.
Step 4: Change the Blending pop-up menu to Soft Light. This blend mode makes bright areas brighter and dark areas a little darker. By doing so, it’ll make your colors pop off the page, as you'll soon see.
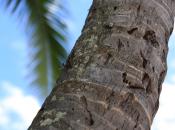
Step 5: In the channel pop-up menu, pick the channel that makes your image look the best. Remember, this kind of color adjustment is purely subjective; there’s no right or wrong channel to pick. The channel that looks the best to you in this image may not look the best in the next one. Here's what each channels look like using an image I shot in San Antonio earlier in the year:

Step 6: Lower the opacity if the effect looks too intense, then click OK to close the Apply Image dialog box.
Step 7: Switch back to RGB mode by choosing Image > Mode > RGB. Again, if you’re asked to merge layers, politefully decline.
As you can see, you can create some amazingly colorful images using this “Lab Pop” technique. The hardest part will be picking which channel looks the best! In fact, the Lightness version creates a whole new “retro” look with a slight greenish tinge. Sweet! Now go put on your sunglasses on and smile smugly as you enjoy the brilliant color of your image.
I'm headed to California this Sunday to teach at the PowerPoint Live Conference in San Diego, then I'll be teaching at the Mac Computer Expo (MCE) the following Saturday in Santa Rosa. In between I'll be holed up in the cutest little Italian cottage you've ever seen trying desperately to finish this Photoshop book. Keep your fingers crossed for me!
Peace out :)


PhotoLesa's photography gear provided by: