
PhotoLesa's photography gear provided by:


 Welcome to part 2 of the "Managing Photos with Bridge" series. Last week you learned how to import and rename your images. The next step is to take a look at them, tossing the ones you don't want and rating the ones you want to keep. It may sound like a boring job but Bridge CS4’s new Review Mode makes it fun; you get to see your photos in a giant, floating carousel.
To use Review Mode, select a folder in the Folders panel or choose multiple images in the Content panel by Command- (Ctrl on a PC) or Shift-clicking them. (If the images are consecutive, click the first image and then Shift-click the last one. If they’re not, click the first image and then Command-click [Ctrl-click] the others.) Then click the Refine button at the top of the Bridge window (it looks like a stack of paper) and choose Review Mode. If you're a fan of keyboard shortcuts, you can press Command-B (Ctrl+B on a PC) to enter Review Mode. Either way, Bridge takes over your entire screen, displaying all your images atop a medium gray background. By using the left and right arrow buttons at the bottom-left corner of your screen, you can flip through your images at speed.
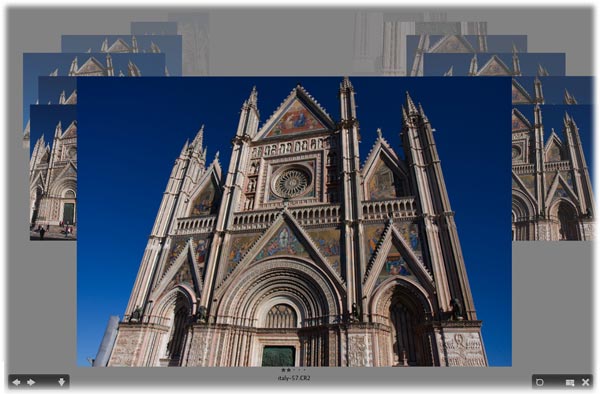
There are many cool and useful things you can do while in Review Mode. For example, you can press the down arrow key on your keyboard to reject an image (or rather, mark it as an image you don't want). You can rotate your images by selecting an image and pressing Command (Ctrl on a PC) along with the left or right bracket key. Pressing Command-] rotates your image clockwise, and pressing Command-[ rotates your image counter clockwise.
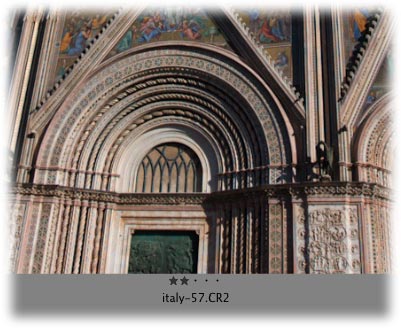
You can also give your images a star rating of 1 to 5 stars by pressing Command-1, 2, 3, 4, 5 (Ctrl+1, 2, 3, 4, 5 on a PC). The star rating will appear beneath the photo (as shown below). Rating your images makes it super simple to find the really good ones later on to burn onto a DVD, make a slideshow, or what have you.
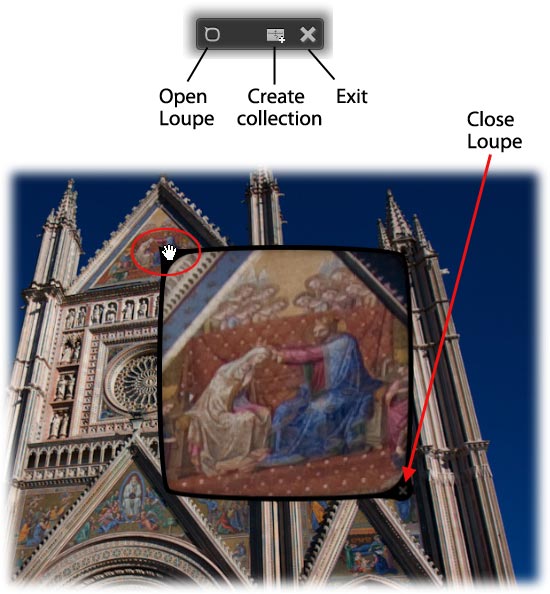
If you want to take a closer look at part of your image, click the Loupe button at the window’s bottom-right corner or just click the image itself. Below you can see a close up of the controls shown at the bottom right of your screen while you're in Review mode. They include:
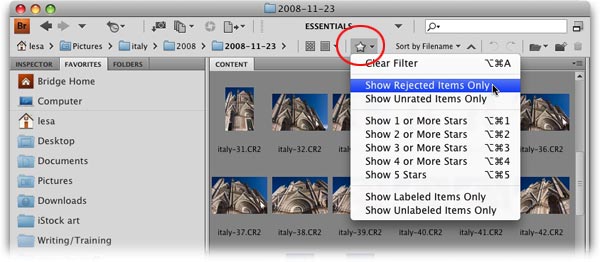
Once you've taken the time to reject and rate your images, you can quickly filter them from the rest of your images so you can: Delete all the rejections in one fell swoop. From the Sort menu (circled below), choose “Show Rejected Items Only”, and then choose File > Move To Trash:
You can also gather your Cream of the Crop images to send off to a stock photography company or build a quick professional-looking slideshow when A Viewing Opportunity arises. Next week we'll take a look at exactly how to build that slideshow a couple of different ones: one that you can view within Bridge and one that you can export as a PDF.
Until then, may the reviewing and rating force be with you!


PhotoLesa's photography gear provided by: