
PhotoLesa's photography gear provided by:


 What’s one of the very last things we do to an image before sending it to print or to the web? We sharpen it. What tool do we use? The Unsharp Mask filter, of course. Anybody know why? I didn’t, until I did a little investigating in the world of sharpening. This filter is named for the old-fashioned darkroom where photographers would, well, mask unsharpness by, "contact printing a film positive (the "mask") from a negative. The developed positive was then put in contact with the negative and positioned slightly out of register, which resulted in an interference pattern (similar to moire), emphasizing edge detail, adding apparent sharpness to the image. The positive/negative pair was then placed in the enlarger or contact printer to produce the final print." Thanks to NAPP member, Allen E. Shifrin for this insightful explanation.
In fact, this very same dark room technique has been employed by professional astronomers for years to enhance fine detail and image structure that would otherwise be hidden by a standard processing method. How cool is that?!
Sharpening filters emphasize the edges in your photograph (edges being bits of your image that have adjacent tonal differences). Think of it as putting a bit of space in between all the areas of contrast in your image, so that everything appears brighter by the slight color separations. For color photographs, the standard Sharpen filters don’t work very well because of the sheer number of tonal differences and the bizarro effects that sharpening often produces (halos, jagged edges, speckles, and so forth).
Unsharp Mask has parameters that allow you to control the aforementioned edges in your photograph, instead of letting Photoshop make all the decisions. These parameters are Amount (which acts like a volume dial), and, the somewhat cryptically named Radius and Threshold. I'll explain what these babies are below.
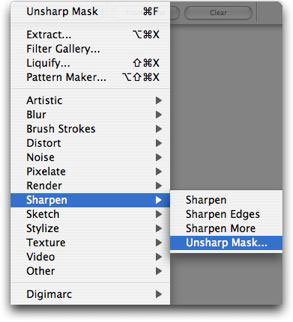
You can access this little gem from the Filter > Sharpen > Unsharp Mask, as shown below:
Now let's talk about Radius and Threshold.
This slider controls how wide the rims of your image edges become. If you push this slider up too far, you’ll get the dreaded ‘edge halo effect’, in that high contrast bits of your image become ringed with a faint light. Radius units differ from pixels and are measured in tenths, so handle them with care. Photographs of faces (finer detail) look best with a smaller Radius setting, and those of landscapes or objects (less detail) can handle a higher setting. High resolution images can handle a larger Radius value. Bear in the mind that Radius interacts with the Amount slider; reducing the Amount allows for more Radius and vice versa. Usually a setting from 0.6 to 2.0 is about right. Photographs with fine details need more Amount and a smaller Radius.
Threshold–where are my edges?
This particular control decides what bits of your image are, in fact, edges. It performs this magic by specifying how much distance must live between adjacent tonal values before the sharpening filter acts, in order to determine if the tonal difference is really an edge. Lower Treshold values allow more bits of your image to be sharpened, and higher Threshold values sharpen fewer areas, as the bits with lower contrast are excluded. The higher you push the Treshold slider, the more it appears to smooth everything out.
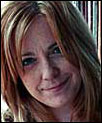
The example below shows the difference between using Threshold and not. I’ve exaggerated the settings so that you can discern a difference; my freckles look like they’re about to *leap* off screen on the left, but appear smoother on the right.
Try a setting of 5 or more for people photographs (portraits), and 0 or 1 for inanimate objects. For example, on an image that’s 150 dpi, you might use the following settings as a general guideline:
Portraits
Amount = 60, Radius = 0.6, Threshold = 6.
Architecture, objects, landscapes, etc.
Amount = 100, Radius = 1, Threshold = 3
As always, feel free to experiment with these settings to get the desired result. Cheers!


PhotoLesa's photography gear provided by: