
PhotoLesa's photography gear provided by:


Photoshop can certainly be a processor hog, though with CS2 the word "hog" just doesn't quite give the devil its due. If you're lucky enough to have installed this behemoth and you find it's running as fast as molasses doesn't, here are five tips and tweaks to rev things back up.
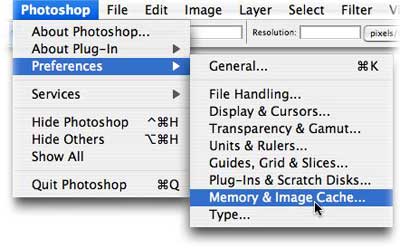
Tip #1 - Tell Photoshop it can have more RAM
Step 1: Open the Photoshop menu, choose Preferences > Memory & Image Cache (Mac: Command-K, PC: Control-K).
Step 2: In the resulting dialog, you'll see two settings: Cache Levels and Memory Usage.
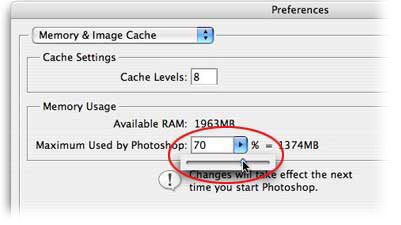
If you work on really large images, try pumping up the Cache Levels (default is 4, maximum is 8). Photoshop uses image caching (storing, rather) to quickly redraw the screen while you're editing. The number you enter tells Photoshop how many low-resolution versions of your image to store as you retouch that masterpiece. The higher the Cache Level, the faster Photoshop will redraw the screen. NOTE: Adobe warns that this can cause your images to open slower, and (quote) "...may cause a less accurate preview. When needed, view files at 100%..." As with most things, it's a trade-off.
Step 3: The Memory Usage slider bar is set at 70% by default. Increase it in 5% increments, and then see how Photoshop behaves. Resist the urge to shove it all the way to the right in one fail swoop. With great power comes great responsibility!
Step 4: Restart Photoshop and enjoy the newfound speed boost. If you find your efficiency still running rather low, then pop open the memory prefs and increase the Memory Usage slider by another 5%.
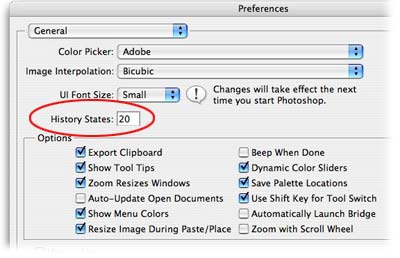
Tip #2 - Decrease the History States
This is a biggy and probably the culprit of most slow-downs in the new version. Photoshop CS2 comes set with 20 history states as default. Even if you Mac has tons-o-RAM, lowering this number will speed things up considerably.
From the Photoshop menu, choose Preferences > General. Decrease the setting circled in red below to 15 and see if that helps. If not, try decreasing it to 10. You'll need to restart Photoshop for the change to take effect.
Tip #3 - Enable the Bigger Tiles Plug-In
Instructions for doing so live here.
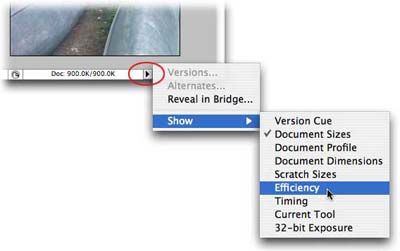
Tip #4 - Turn on the Efficiency Indicator
Before you go spending any hard earned cash, it's possible to see how efficiently Photoshop is running with what you have now. Simply turn on Photoshop's efficiency indicator, and watch it while you work.
Step 1: Choose Efficiency from the pop-up menu on the status bar of an open image, as shown below:
Step 2: You'll now see an efficiency percentage appear at the bottom of your open document. Whenever you perform an action on the image, give her a look:
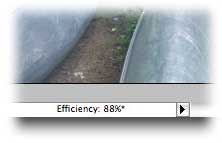
When efficiency drops below 95-100%, you are using the scratch disk (meaning Photoshop is utilizing some of your hard drive space as RAM, which is quite normal). However, if the efficiency hovers around 60%, you should see a honkin' big performance increase by either increasing your RAM allocation (as described below) and/or adding more physical RAM.
Tip #5 - Buy More Physical RAM
Here's a little tip for buying RAM online. Be sure to visit ramseeker.com for up-to-date online price comparisons. Through that site, I was able to pick up a couple of 1 GB sticks for $107 each from www.18004memory.com. What a bargain!
Once you've installed it, then follow Tip 1 above to let Photoshop know about the newfound surplus :)


PhotoLesa's photography gear provided by: