
PhotoLesa's photography gear provided by:


Sometimes it's next to impossible to figure out which bits of an image are the blackest black, and/or the whitest white. Picking the wrong area can produce "not so correct" color correction. So how can you find out which pixels are really black, and which pixels are really white? To become a real pixel super sleuth, you need to cozy up to the Threshold dialog box.
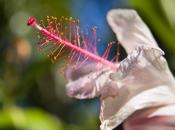
Let me show you how by using an example of one of my favorite snacks: melted brie with raisins. RECIPE: Sprinkle empty plate with golden raisins. Slice brie in approx. 1/2 in. thick slabs and arrange atop said raisins. Sprinkle some more raisins on top. Microwave for about 25-35 seconds or until slightly melted. Eat with crackers. Drink a glass of Beringer Founders' Estate Chardonnay. Oh yeah baby :)
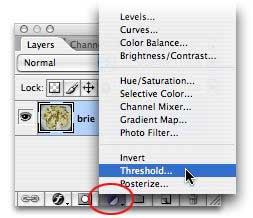
Step 1: With an open image and the background layer editable, trot over to the Layers Palette. Create an adjustment layer by clicking the half black/half white circle at the bottom, and choose Threshold from the flyout menu.
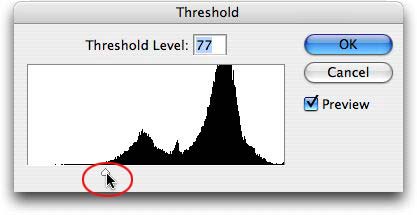
Step 2: In the Threshold dialog box, starting pulling the little slider at the bottom towards the left.
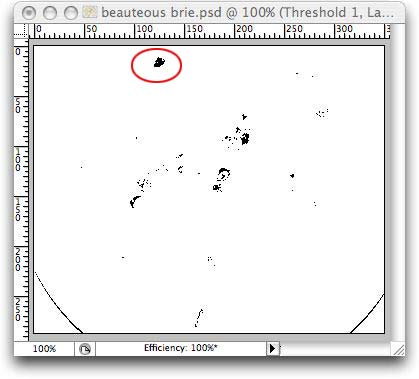
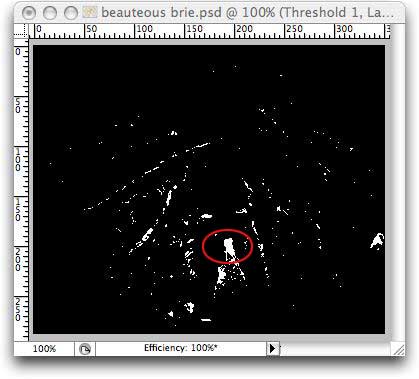
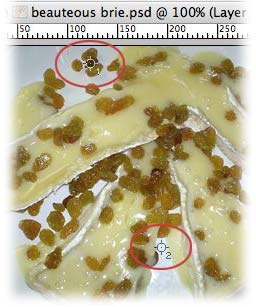
See the remaining bits of your photo? Those are the darkest bits. Remember where they are! (If you can't, no worries; I'll cover how to mark those spots in a minte.) If you pulled the slider all the way left, chances are the entire image would go blank. In our case, the raisin towards the top left of our image is the darkest (circled below in red).
Step 3: Now, pull the little slider towards the right.
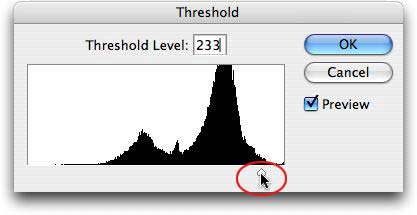
Guess what? Those remaining bits of your photo are the lightest bits. Remember that spot as well. I've circled what we should target as white below.
At this point, you can click Cancel to send the now unwanted Threshold adjustment layer away. And now that you know exactly where the darkest and lightest bits of your image live, you can proceed with Step 1 in the Warp Speed Color Correction tutorial.
If you fear you won't remember where those light and dark bits are after closing the Threshold dialog box, Photoshop offers an easy way to mark them.
Step 1: Create an adjustment Threshold layer as explained above, find the darkest bit, and click OK in the Threshold dialog box. We're not going to trash the Threshold layer just yet. Read on.
Step 2: Choose the Color Sampler Tool in the Tools palette, or just press the letter I. Make sure to pick the tool that has a little crosshair-looking icon to its left.

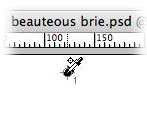
Step 3: Click on the darkest bit of the image and you'll see a round marker with the number 1 appear, as shown below. This marker's just for you; it won't print or remain on your image except when viewing it in Photoshop.
NOTE: If you click the wrong spot, just delete that marker. Simply press Option on a Mac (Alt on a PC) and your cursor turns to a pair of scissors. Click once on the offending marker to send it far, far away.
Step 4: Double click the Threshold layer and drag the slider to the right and find the lightest point, then click OK.
Step 5: Now, click that point in the image with the Color Sampler Tool and you'll see another round marker appear in that place, this time labeled 2.
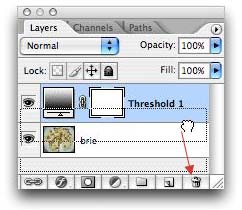
Step 6: Send the Threshold layer packing by dragging it to the small trash can icon at the bottom right of the Layers Palette.
Back in the image, you'll find the markers dutifully denoting where you need to click when setting the white and black points in either Curves or Levels.
NOTE: If you select any other tool before venturing off to color correction land, your markers will vanish. Don't panic! Just re-select the Color Sampler marker tool and they'll pop back on screen.
Now you're ready to proceed with Warp Speed Color Correction. Enjoy :)


PhotoLesa's photography gear provided by: