
PhotoLesa's photography gear provided by:


So this morning I'm brainstorming tutorial ideas when a friend of mine iChats me (curious how a software name can morph into an action verb). I tell him I'm busy writing and he says, "Oh I have a great tutorial idea for you. Show me how to stitch these photos together," he says and forwards these three rather uninspiring photos from a recent trip to Toronto:
GAK, I think to myself. Even if I can stitch them together it's still going to be, well, slightly less than awe inspiring. Or so I thought. Turns out with just a little creativity, I was able to turn these dullish shots into something different and fun. And since it's summer and everyone's supposedly (allegedly, reportedly) vacationing here and there, it might give *you* some interesting ideas too.
But first, let us chat briefly about snapping shots intended for panoramas:
 Tip #1: You want to take steady shots, so use a tripod or some other stabilizing element like your mate's shoulder, or rest your shooting elbow up against a building.
Tip #2: Include an overlapping element in each shot. That is, if you're taking a series of three shots, make sure you include a slice from the first shot in the second, and a slice of the second shot in the third. That way you have bits to align with. This will make more sense in a few minutes.
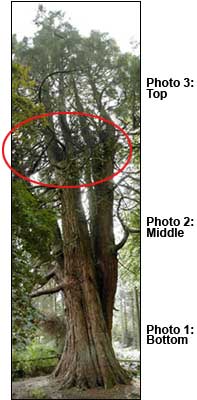
Tip #3: Try to ensure that the lighting (exposure) is similar. For example, I stitched together this photo of a really big tree. The bottom and middle photos matched up perfectly (because they overlapped and I could see how to align them), but the top photo was dark due to the lack of light coming through the limbs. I lightened it and then blurred the bits together in Photoshop, but the result wasn't as great as it could have been, as you can see circled in red at left.
Tip #4: Make sure the angles in which you take the photos are the same, otherwise you'll have a heck of a time matching them up. However, that can make for some interesting creative possibilities, as you'll see with the Union Station photos above.
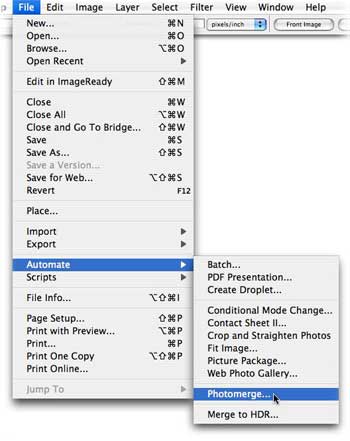
This little trick is doable in both Photoshop and in Photoshop Elements, though the command lives in different places (of course). Today we're using Photoshop, though the process is similar in Elements. Just choose Find > New > Photomerge Panorama.
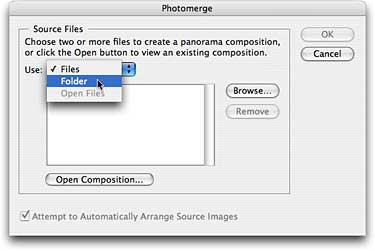
Step 1: Round up the photos you'll be using, and stuff them into a folder (you don't *have* to do this, but I'm a bit of a neat freak).
Step 2: Choose File > Automate > Photomerge. There is all kinds of magic to be found in the Automate menu (Adobe is notorious for hiding coolness there).
Step 3: Direct Photoshop to your photos. In our case, it's a folder called Panorama. Press OK. Photoshop will then start popping open your photos and attempt to match them up.
Step 4: If Photoshop's unable to match the photos, you get a courteous little error message, inviting you to drag your photos onto the work area and arrange them yourself, as shown below.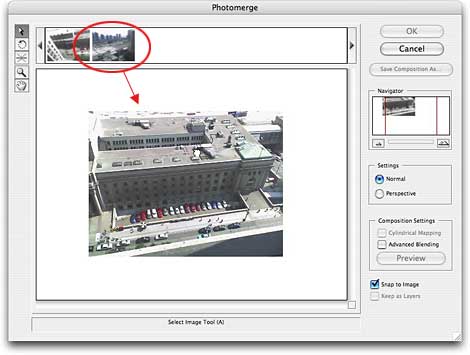
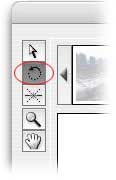
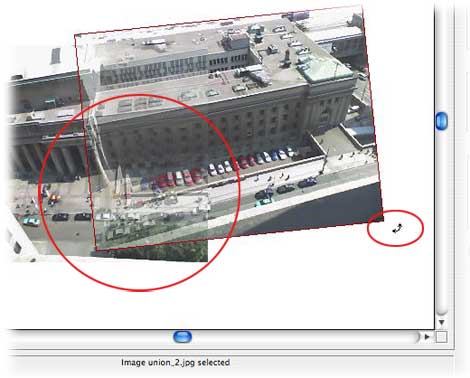
Step 5: You've got a couple of important tools to work with here: the Arrow which lets you drag photos around, and the Rotate tool (circled in red below). Other tools (in order) are Set Vanishing Point, Zoom, and Move View (referring to the work area shown above).
As you click to drag the photos around, you'll notice that the one you have selected becomes somewhat transparent (circled below in red) allowing you to see the photo beneath. Now you understand the importance of having overlapping elements in each photo. How else would you match them up? In our case, I had to do some rotating as shown in the excerpt below.
Step 6: When you're finished arranging and rotating, decide whether you want the photos to live on their own layer, or merged onto one (note the "Keep as Layers" checkbox in the bottom right corner of the Photomerge window). I chose to leave them on one layer so I could play with a border later on. Click OK. Photoshop magically merges everything together and plops you back into your regular workspace.
Step 7: To make this panorama more interesting, I created a Polaroid-ish border, though first I increased my canvas area to make more room. Choose Image > Canvas Size (Mac: Command-Option-C, PC: Alt-Control-C).
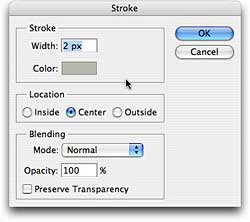
Step 8: Back in the Layers Palette, select the layer named "Photomerge," then choose Edit > Stroke. Enter a width of 2 pixels, click the color chip and choose a nice gray, select location center, and click OK.
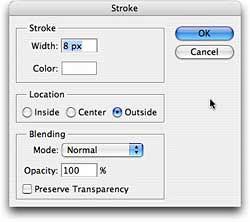
Step 9: Stroke the edge again, but this time make it thicker (around 8 pixels), make it white, and set the location to outside.
For final touches, I added a soft drop shadow (click the circled F--Layer Effects-- at the bottom of the Layers Palette), sampled a blue from the photo and filled a new layer on the bottom of my layers stack with it. Last but not least I made a rectangular selection on the blue layer, feathered it by 5 pixels, and clicked on the half black/half white circle in my Layers Palette to create a layer mask.
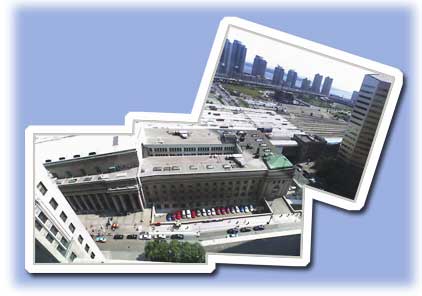
As you can see above, the result is fun and festive; a far cry from what I started out with (oy!). The stitch isn't perfect, but then again, each photo was shot on slightly different angles. Hopefully next time he'll read my tips above and be able to create a beautiful panorama all by himself :)


PhotoLesa's photography gear provided by: