
PhotoLesa's photography gear provided by:


"Wow!" your friends will say. "How'd you do that?" will soon follow. These are the exclamations you'll hear while showing off your new Elements chops with this slightly magical and creative photo effect.
We'll take an ordinary photo and place a Polaroid-ish color picture box on top of a grayscale version of the same image. It's a really neat way to draw the viewer's eye and accentuate the subject matter or focal point of a photo. The magical part is that the color picture box will be movable! By using two different kinds of adjustment layers to create the effect, you'll be able to move the color picture box anywhere you want, leaving the grayscale version of the photo in its wake.
Sound intriguing? Read on!
The first step is to create a picture box where the color portion of the photo will live. By using a Solid Color adjustment layer, we'll gain the ability to change the size and rotation angle of the picture box later on, in case we don't get it perfect the first time.
Step 1: Press M to select the Rectangular Marquee tool and draw a box around part of the image. Don't worry too much about its size or location because we can change it later.
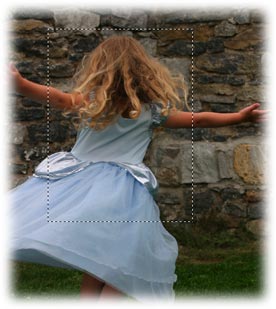
TIP: Press and hold the Option key (PC: Alt) to draw the box from the center outward. Press the Spacebar as you draw the selection to move it around on the photo (just release the Spacebar and continue making the selection larger or smaller). These keyboard shortcuts also work when using the Elliptical Marquee tool.
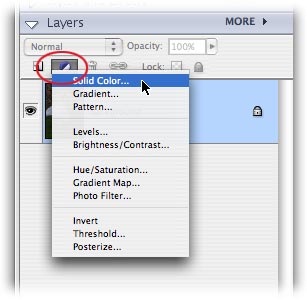
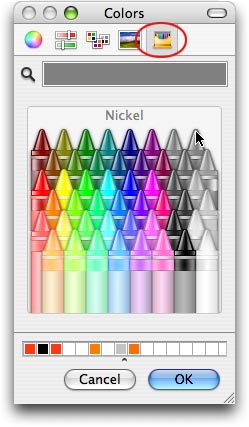
Step 2: Create an adjustment layer by clicking the half back/half white circle at the top of the layers palette. Choose Solid Color from the pop-up menu and when the Color Picker appears, choose a nice charcoal gray. Press OK to continue.
The picture box should now be filled with gray.
TIP: It might be easier to get the right shade of gray by using the Crayon color picker. Just click the little box of crayons at the top right of the Color Picker palette, circled in red below. Pick either dark gray crayons on the top row.
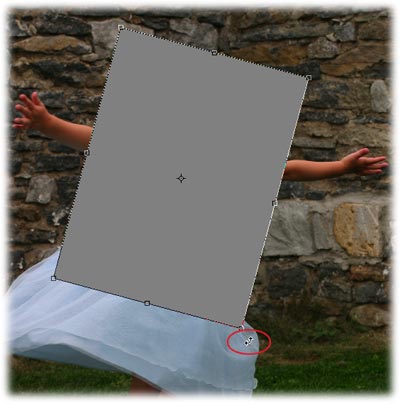
Step 3: Rotate the box by pressing Command + T to invoke Free Transform (PC: Ctrl + T). Position the cursor below the bottom left corner of the box and drag upward to rotate the box slightly. Feel free to resize it too, if you'd like. Press Return to accept the transformation once you're finished.
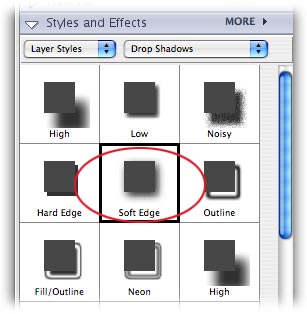
Step 4: A great way to add depth is to add a drop shadow. Locate the Styles and Effects palette and choose Layer Styles from the left hand pop-up menu, and Drop Shadows from the pop-up menu on the right. Click the Soft Edge shadow button once to add it to the currently selected layer.
TIP: To edit the shadow, just double-click the tiny cursive "f" next to the layer thumbnail in the layers palette.
Step 5: To make the original image viewable through the picture box, we need to change the layer Blend Mode to Overlay. Changing a layer's Blend Mode changes the way it interacts with the layers beneath it. The Overlay mode ignores the color gray, allowing anything underneath to show through any gray areas. By using dark gray as a fill color for the picture box earlier, we've created a window to the original image below.
To drain the color from the image without harming it, we'll use an adjustment layer of a different type.
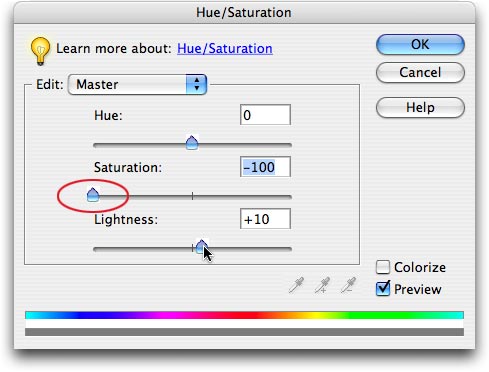
Step 6: Click the half black/half white circle at the top of the layers palette and choose Hue/Saturation from the pop-up menu.
Step 7: Drag the Saturation slider all the way to the left to drain all color from the image. Next, drag the Lighten slider to the right just a bit to lighten the overall image.
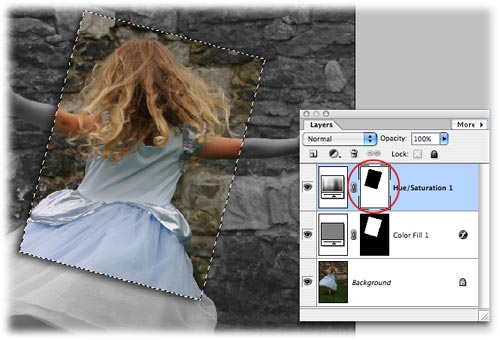
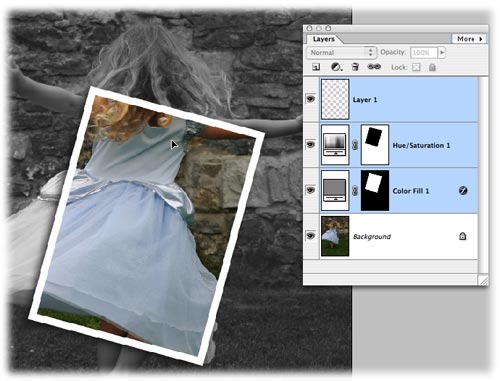
One of the advantages of using adjustment layers is that they come with their very own layer mask. A layer mask is simply a way to hide pixels, or in this case, the effects of the adjustment layer it's attached to. By painting with black onto the hue/saturation adjustment layer mask, we'll hide the grayscale conversion of the image, thereby returning that portion to color.
Step 8: Command-click (PC: Ctrl-click) the layer mask of the Color Fill adjustment layer (circled in red) to create a selection of our picture box. Selection ants should now be marching dutifully around the box.
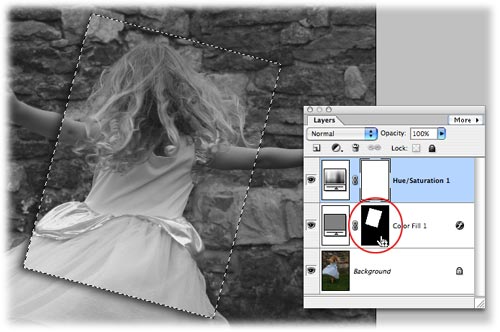
Step 9: Take a peek at the color chips at the bottom of the main Toolbox. Press D to set them to the default of black and white and press X until white hops on top. Click once in the layer mask of the Hue/Saturation adjustment layer (circled in red) and fill the selection with black by pressing Option + Delete (PC: Alt + Delete). That area should now be in full color. Don't deselect just yet, as we've one more use for that picture box selection.
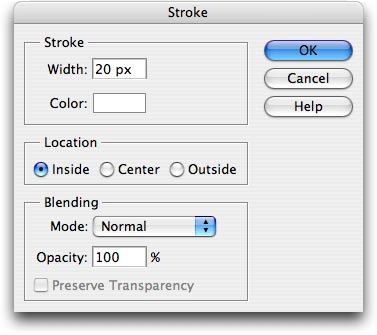
A picture within a picture wouldn't be complete without a frame. We'll use the selection we already have and apply a thick stroke to give to create it a Polaroid-ish look. Because we don't know exactly what size frame we want, let's put it on its own layer.
Step 11: Create a new layer for the frame by pressing the New Layer icon at the top left of the layers palette.

Step 12: With the new layer selected and marching ants surrounding the picture box area, hop up to the Edit menu and choose Stroke (Outline) Selection. In the resulting dialog, type 20 px into the width box, click the color well and choose white, and choose Inside for Location. Click OK when finished. Now a white border should appear around the picture box. Press Command + D (PC: Ctrl + D) to deselect and get rid of the marching ants.
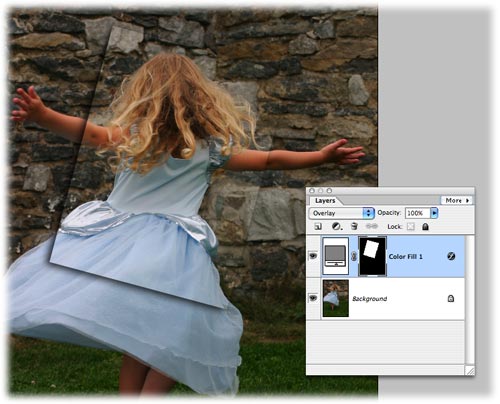
The super cool thing about this effect is that we can move the picture box, and therefore the color area, wherever we want. Just Command-click (PC: Ctrl-click) to select the three new layers (everything except the background layer), and press V to select the Move tool. Mouse over to the document and move the picture box wherever you want. Smile with smug satisfaction as the color moves right along with it.
Until next time, may the creative force be with you all!


PhotoLesa's photography gear provided by: