
PhotoLesa's photography gear provided by:


Welcome back! Last week we looked at how to embed a watermark and copyright information into your images before you email or post them online. As easy as the process is--using the copyright symbol Custom Shape Tool plus your name as text--it's not exactly fast.
Just think about it: If you're one of those 30-inch Cinema Display Dudes, it would take a *seriously* long time to mouse all the way up to the Custom Shapes palette in the Options bar and back down to the document again. Who has that kind of time?! What you really need is to automate the whole process so that you can watermark an entire folder full of images at one time.
In Photoshop, you can do this by recording and saving your keystrokes. This is called creating an Action and that's exactly what we're about to do. We'll record the same steps we used in part 1 of this tutorial (node#283), though we'll need to turn on the recording software first. NOTE: You may want to open part 1 of the tutorial in another window for convenience (just click the link in this sentence), or print it out.
WARNING: Actions, by their very nature, are extreme anal and precise little creatures. They are what I like to call Unforgiving. You must take care to choose every option or setting down to the most minute of details when recording these little buggers. Remember, any changes made in the Options bar or the Layers Palette (like blending modes and opacity) for ANY tool remain until you change them back. For instance, if I were to create an action that types my name in black text, I must be careful to:
Let's say the last time the Custom Shape Tool was used it was set to a blending mode of Soft Light. Therefore, the next custom shape you create will also be set to Soft Light. Thus, the Action recording software won't see that you are selecting Soft Light as a blending mode if that's what the blending mode is already set to. Instead, the recording software sees that no change was made in blending modes and does nothing. If this happens while recording, set the blending mode to Normal then immediately set it to Soft Light.
However, I find it to be easier to run through the operation and reset all tools involved to their default settings BEFORE I record. And no matter what I'm recording, I always start off with choosing the Move tool just to force myself to start from scratch. Okay, so I may be a little anal and precise myself. Read on!
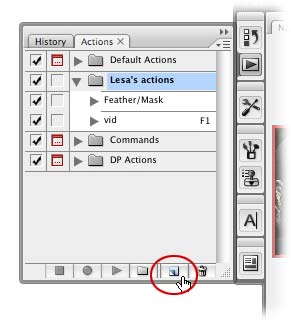
Step 1: With the offending image open, choose Window > Actions. If you're running Photoshop CS3, you can open the Actions palette by clicking the Play button on the vertical toolbar on the right side of your screen, near the palettes (shown in the screen shot beneath step 2).

Step 2: Click the New Action button at the bottom of the Action palette, circled below in red.
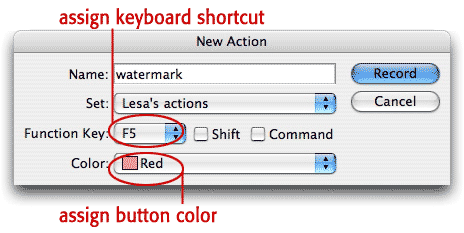
Step 3: In the resulting dialog, give your action a clever name like "watermark". Add a keyboard shortcut for the action by choosing a Function key from the pop-up (click the Shift and Command checkboxes to add those keys as modifiers). Also take a moment to assign a color for the shortcut, for reasons which will be revealed in a moment. Click Record when finished.
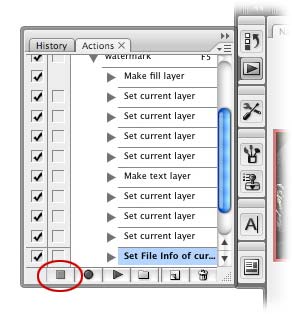
Step 4: Proceed to part one of this tutorial to create your watermark, though be extra sure that you don't miss a single step (as per the warnings given above). When you are finished recording, click the Stop button at the bottom of the Actions palette (circled below in red).
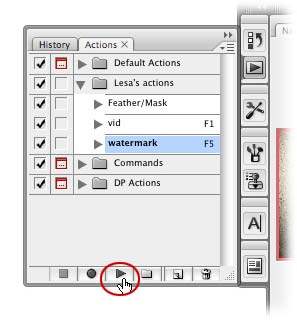
Step 5: To test the action, open another photo, highlight the appropriate action and press the Play button. You'll be alerted if there were any problems. (If it makes you feel any better, it took me three tries before I got it just right.)
After I did get it right, Photoshop slapped a watermark on the image in under a second:

Oh sure you can just select your new bright and shiny action and press Play, but I recommended entering button mode. You'll save a step (actually one click) and it makes the Actions palette look cool. Here's how.
Step 6: Click the Actions palette fly-out button (top right) and select Button Mode.
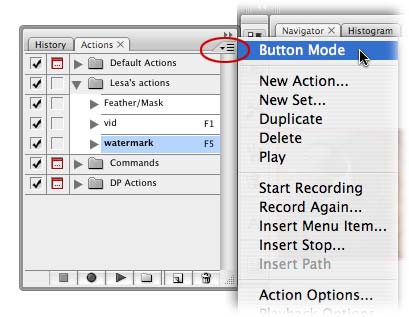
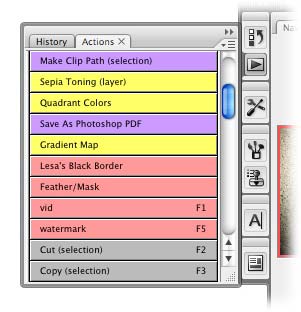
Remember setting a color for the action when recording it? Button mode is the reason I wanted you do that. Since this mode displays ALL actions currently loaded, it's good to make your own a bit more visible. By making my actions red, I can spot them at a glance:
The real power of actions lie in applying them to an entire folder full of photos. Here's how to do it.
Step 1: After you've created the action and tested it, choose File > Automate > Batch.

Step 2: In the resulting dialog, choose the Set where your action lives and from the Action pop-up, choose watermark. For Source, click the Choose button and navigate to where the folder full of pictures lives on your hard drive. For Destination, choose Save and Close.
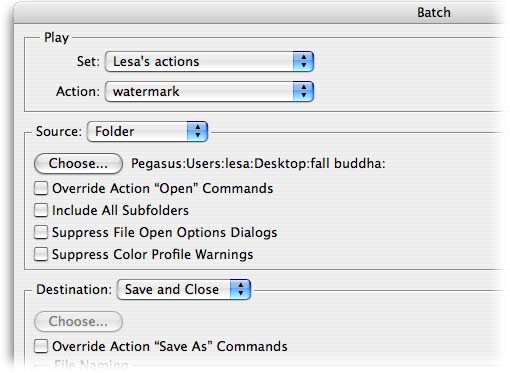
There are myriad other options in this rather massive dialog, and I invite you to explore them all. Actions can be a huge timesaver, though they do require a little patience in the setup.
See you back here next week!


PhotoLesa's photography gear provided by: