
PhotoLesa's photography gear provided by:


I don't know about you, but I really hate it when the light of my camera flash occurs too fast for the iris of my subject's eye to close the pupil, making the light pass through the blood-rich area alongside the iris (called the choroid) and strike the retina. Then some of the light is reflected back out through the iris, and the camera records it, even though that light has now passed through the reddish choroid twice.
Arg :)
What I'm talking about, of course, is red-eye. and even though both Adobe Photoshop and Elements have specific tools to fix the problem (Elements being superior with its automatic red-eye detector/fixer), sometimes you have to take matters into your own hands. Fortunately, both programs have another tool that's perfect for the job: the Color Replacement tool.
Let's take it for a spin on the photo of reader's baby boy. But first let's give the Red-Eye tool a shot and see what happens.
Oh, and by the way, "red-eye is generally more pronounced in people with grey or blue eyes, and of course in kiddos. This is because pale irises have less melanin in them, thus allowing more light to pass through to the retina. Children, despite superficial appearances, do not have larger pupils but their pupils are more reactive to light and are able to open to the fullest extent in low light conditions." Thanks to Wikipedia for that insight!
In Photoshop, this tool lives within the Healing Brushes in the Tools palette. In Elements, go to the QuickFix mode and you'll see the Auto Red-Eye fix button on the right side of your screen in the topmost palette.
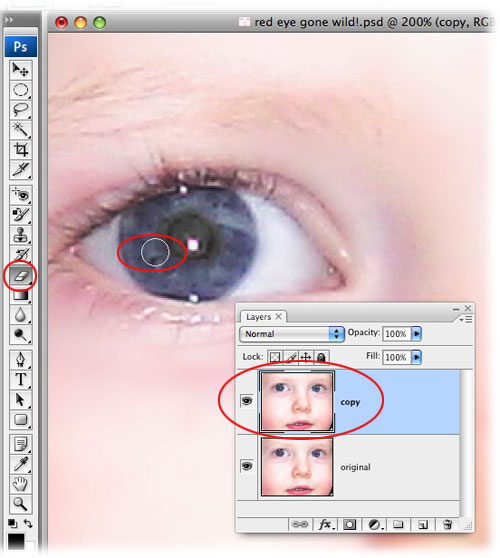
Step 1: Duplicate the original layer by pressing Command + J (PC: Ctrl + J). Because both of the tools we're about to use are destructive (they alter the actual pixels on that layer), this move protects thyself from thyself, so to speak.
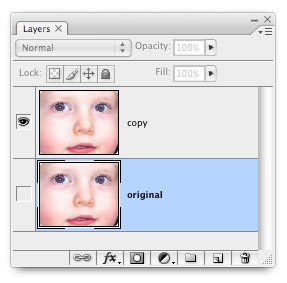
Step 2: In the Layers palette, select the duplicate layer and grab the Red-Eye tool from the Tools palette (it's hiding beneath all the Healing Brushes). Draw a box around the offending iris and release.
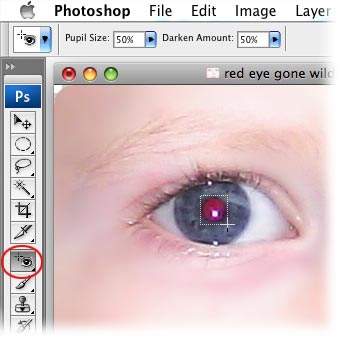
Depending upon your particular case of red-eye, that's all there is to fixing it. Although, if you have a case of serious red-eye, this tool won't do you much good:

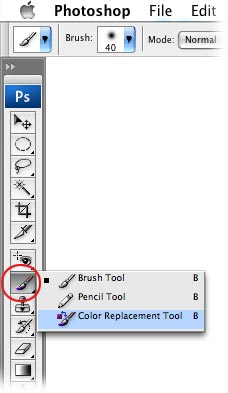
Let's have another go at these eyes with the Color Replacement tool. In Photoshop this tool lives beneath the Brush tool, though in Elements it's sitting nice and pretty in the Tools palette all by itself.
Step 3: Select the Color Replacement tool, as shown below.
Step 4: Choose the replacement color, which would be black in this case. Just press D to set your color chips to the default of black and white, then press X until black hops on top.

Step 5: In the Options bar, set the Mode to Hue, Limits to Contiguous, and the Tolerance to around 30%. Mouse over to the offending iris and paint away the red, being careful to touch only the red with the crosshair.
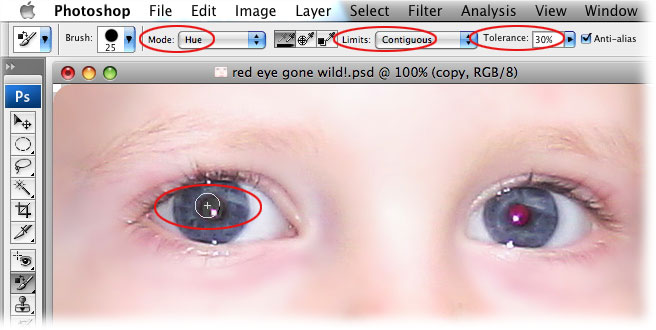
TIP: You'll want to keep the brush size rather small. Press the left bracket key, [, to cycle down in brush size, and the right bracket key, ], to cycle up.
For you geeks out there, choosing the Hue mode means that we're replacing the color without altering the brightness. Setting the Limits to contiguous means that we believe the red area to be conslidated in one spot, and not separated by other colors. The Tolerance setting determines how picky the tool is. Enter a lower number for the tool to be pickier, or a higher number for a Color Replacing Free For All.
If you end up with a little black outside the iris area, you can use the plain old Eraser tool to fix it.
Step 6: Turn on the visibility eyeball of the original layer and then select the duplicate layer. Press E to select the Eraser tool and very carefully, paint away the extra black as shown below. With this method, the original layer will show through the area you erase, thus correcting the mistake.
Here's the finished product:
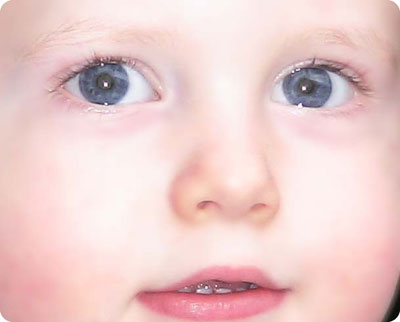
Not bad eh? The Color Replacement tool did indeed replace the ugly red with black. It worked so well, in fact, that you might suspect it would work brilliantly in most any situation where you want to change color.
And most of the time you'd be wrong :)
If you're trying to replace a dark color, it won't work well at all. To illustrate, I chose a replacement color of green and attempted to paint away the red back of this ski jacket. Notice the ugly red edges below:

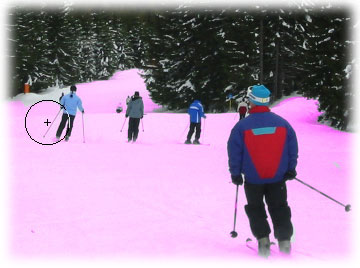
Although, if you wanted to repaint say, the snow (which originally has no color), the Color Replacement tool works pretty well. Below I've quickly repainted the snow hot pink. In fact, as long as you don't touch any of the skiers with the crosshair of the cursor, they remain in their original color. It's a super quick way to add color where there was none.
Likewise, when replacing a rather light color with something also fairly light, it does a decent job. Below I'm replacing the yellow stripes of my ski suit with green. Whee!
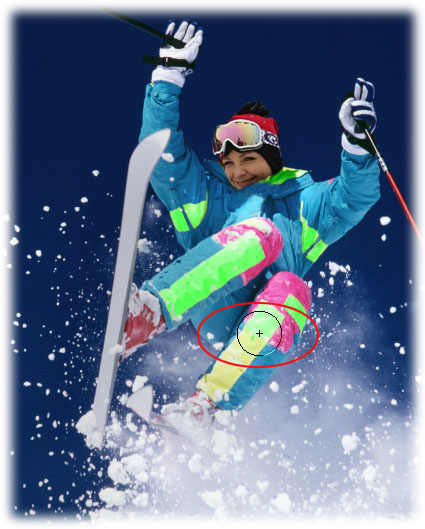
Okay fine so it's not really *my* ski suit (though it is my ski head)! I've been dying to go skiing lately so I couldn't resist the opportunity to hit the slopes digitally. Perhaps "head replacement" should be my next tutorial :)
Until next week, happy red-eye fixing!


PhotoLesa's photography gear provided by: