
PhotoLesa's photography gear provided by:


As the Great Kelby once taught me, anytime you can add a drop shadow, you should. Heck, if you’re a freelancer, adding a drop shadow means you can tack on an extra $50 to the job! Though when it comes to creating the aforementioned shadows, it’s important to remember that the classiest ones are rarely black—instead they pick up a color from your design. In the next few minutes, you’ll learn how to easily change your drop shadows to any color you want.
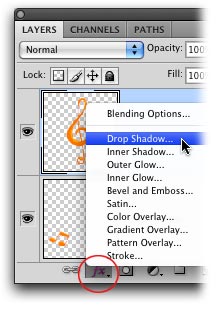
Step 1: Select the soon-to-be-shadowed layer in your Layers panel and click the “Add a layer style” button at the bottom of your Layers panel (it looks like a tiny cursive “fx” and is circled below). From the resulting menu, choose Drop Shadow.
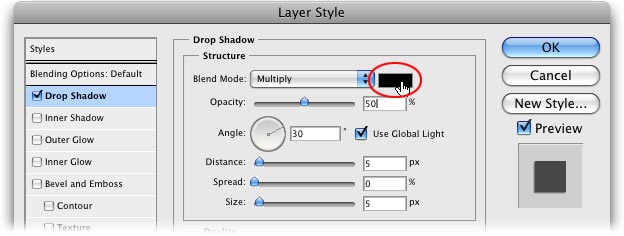
Step 2: In the resulting honkin’ big Layer Styles dialog, adjust the Opacity to produce a respectable (soft) though not overly gaudy (black and ten feet away) drop shadow. You might reduce it to 50% so the shadow is nice and subtle. Next, click the tiny black square to the right of the Blend Mode pop-up menu (circled below). This is called a color well and it controls the color of your shadow.
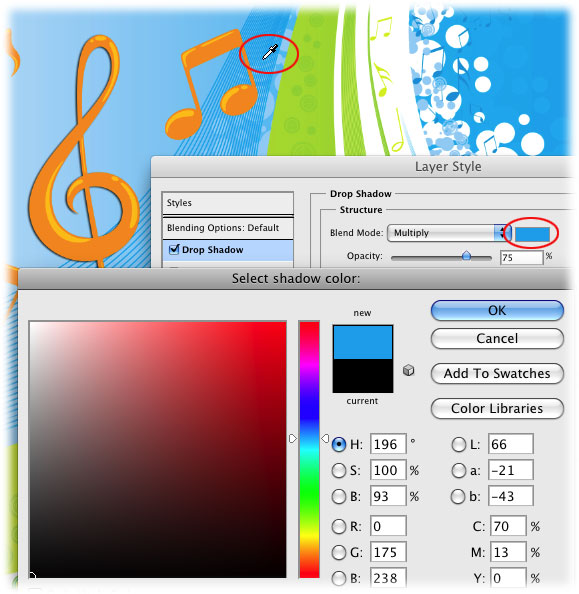
Step 3: When Photoshop opens the Color Picker, you’ve got two choices: you can pick up a color that lives somewhere else in your image, or you can pick the color you want by clicking within the Color Picker itself. In most cases, the first method works just fine. To pick up color from your image, mouse over to your document and your cursor will turn into a tiny eyedropper (circled). Click once to sample (or rather, pick up) a color. Keep clicking until you get the color you want; you’ll see the new shadow color appear at the top of the Color Picker and in the Layer Style dialog (also circled).
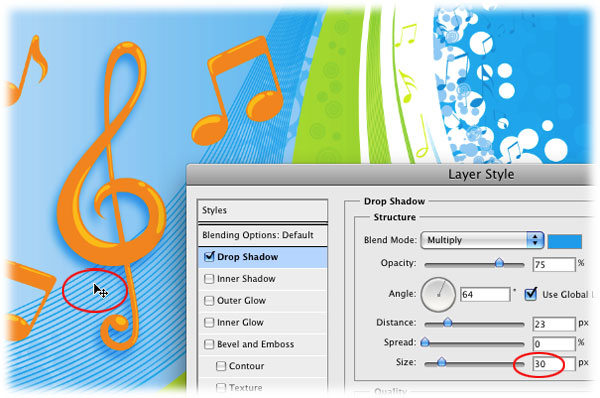
Step 4: Increase the size of your shadow so you can actually see the darn thing by using the Size slider circled below. Position your shadow by mousing over to your document and dragging the shadow around with your mouse. You don’t have to swap tools or anything—your cursor will turn into an arrow (circled below) as soon as you mouse away from the Layer Styles dialog box.
That’s all there is to adding, changing the color, and repositioning a drop shadow. However, if you ever want to make your drop shadow white, there’s one more step. Keep reading!
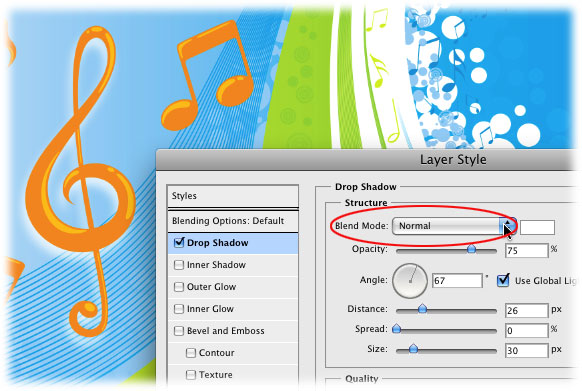
By default, the blend mode of your drop shadow is set to Multiply, as shown in the screen shot in step 2 above. Blend Modes merely determine how color on one layer interacts with color on other layers, or in this case, on a layer style. With some modes, Photoshop looks at the color on one layer and the color on another layer and keeps only the darkest colors where the colors intersect (as is the case with modes in the Darken category, like Multiply). With other blend modes, the lightest colors remain (as you might suspect, these modes live in the Lighten category).
If you change the drop shadow color to white and leave the blend mode set at Multiply, you won’t see a shadow at all. In order to make a white drop shadow, all you need to do is change the Blend Mode pop-up menu in the Layer Styles dialog to Normal, and then click the little color swatch to its right and pick white from the resulting Color Picker. Who knew?!
Until next week, may the colored drop shadow force be with you all!


PhotoLesa's photography gear provided by: